iOS Widget#
Background#
At first, I found that Alipay's Widget looked very nice, so I planned to create a similar one. During the process, I discovered that Widgets have so many interesting aspects. Therefore, I would like to record and share some insights here:
Do you know how to create a Widget similar to QQ Sync Assistant?

Do you know how the different group Widget effects similar to Eastmoney are achieved?


Do you know how the Alipay Widget functions shown in the image below are implemented?


Or to put it this way, are you aware of the concepts of supportedFamilies, WidgetBundle, and Configurable Widget? If you know all of them, then you don't need to read this article.
- The QQ Sync Assistant's Widget only displays the effect of one Widget, as it has set the Widget's
supportedFamiliesto only the systemMedium style; - The multiple group Widgets of Eastmoney are achieved through
WidgetBundle, allowing multiple Widgets to be set, each with its own size settings; to distinguish whetherWidgetBundleis used, you can check if the text in the Widget preview synchronizes with the scroll: for the same Widget with different sizes, the title and description at the top will not move when scrolling; for different groups of Widgets, each Widget has its own title and description, and the text will scroll together. - The Alipay Widget uses
Configurable Widget, definingEnumtypes and custom data types, setting the Intent'sDynamic OptionsandSupports multiple values.
Development#
Before we start, a note:
If you need to use communication between the APP and Widget, such as displaying the weather in Alipay, you would get the city from the APP's location, save it locally, and then retrieve the locally saved city from the Widget to get the weather. This communication requires an APPGroup; if you don't need to pass values between the APP and Widget, you don't need to set an APPGroup. However, if you set an APPGroup, you need to ensure that the Widget and the main APP have the same APPGroup. For detailed usage of APPGroup, you can refer to Data Sharing Between Apps - App Group Configuration, which will not be elaborated here.
Creating a Widget#
To create a Widget, select File -> New -> Target -> Widget Extension.

Click Next, enter the name of the Widget, and uncheck Include Configuration Intent.

Click Next, and a prompt will appear asking whether to switch the Target; click Activate to switch to the Widget Target;

You can either click Activate or cancel in the above steps; clicking Activate will actively switch the Target to Widget in Xcode, while clicking cancel will keep the current Target. You can switch manually at any time.

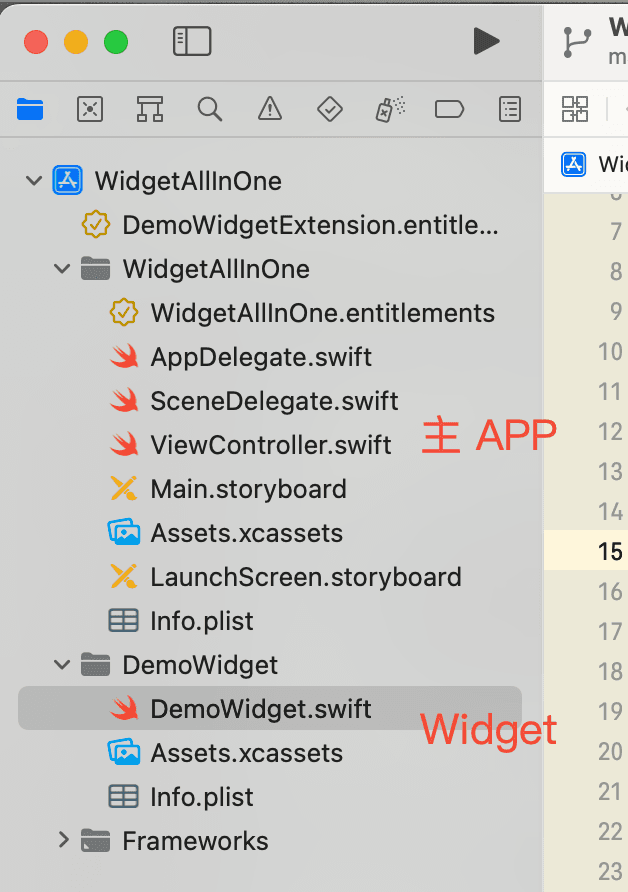
Now the Widget has been created. Let's take a look at the current project structure:
Next, let's look at the code in the .swift file of the Widget. The entry and delegate methods are all in this class:
It is divided into several parts, as follows:
- TimeLineProvider, a protocol that defines three required methods for the default display of the Widget and when to refresh:
func placeholder(in context: Context) -> SimpleEntryfunc getSnapshot(in context: Context, completion: @escaping (SimpleEntry) -> ())This method defines how the Widget preview is displayed, so default values should be provided here.func getTimeline(in context: Context, completion: @escaping (Timeline<Entry>) -> ())This method determines when the Widget refreshes.
- TimelineEntry, this class must also be implemented, where the Date is used to determine the refresh timing. If there is a custom Intent, it is also passed to the View from here.
- View, the Widget's View.
- Widget, where the Widget's title and description, as well as supportedFamilies, are set.
- PreviewProvider, this is the SwiftUI preview, allowing you to see the effect while modifying, which can be deleted.
After reading the above, you might still be confused, but don't worry, just keep reading, and after creating a couple of Widgets, you will understand the purpose of each part.
QQ Sync Assistant's Widget#
Creating WidgetUI#
Let's start by creating the simplest QQ Sync Assistant Widget. Download the project from the Tutorial1 folder, open it, and create a new SwiftUIView, as shown below:

Click Next, enter the file name QQSyncWidgetView, and make sure the selected Target is the Widget's Target, not the main project, as shown below:

Then open QQSyncWidgetView, and the file content is as follows:
//
//  QQSyncWidgetView.swift
//  DemoWidgetExtension
//
//  Created by Horizon on 01/06/2022.
//

import SwiftUI

struct QQSyncWidgetView: View {
    var body: some View {
        Text(/*@START_MENU_TOKEN@*/"Hello, World!"/*@END_MENU_TOKEN@*/)
    }
}

struct QQSyncWidgetView_Previews: PreviewProvider {
    static var previews: some View {
        QQSyncWidgetView()
    }
}
In this, QQSyncWidgetView contains the SwiftUI View code, which is where you modify the layout; QQSyncWidgetView_Previews controls the preview View, which can be deleted. Now let's look at what content the QQ Sync Assistant Widget should include:

As shown above, it can be divided into three parts: background image, left text View, and right text View. The background image and the two Views' front and back relationships are implemented using ZStack, the left and right relationships between the two Views are implemented using HStack, and the vertical layout of the text inside the View is done using VStack. The resource files for testing are placed in the QQSyncImages folder.
The content of SwiftUI can refer to Stanford's tutorial, linked below:
After filling in the content, it looks like this:
struct QQSyncWidgetView: View {
        ZStack {
            // Background image
            Image("widget_background_test")
                .resizable()

            // Left and right Views
            HStack {
                Spacer()
                // Left View
                VStack(alignment: .leading) {
                    Spacer()
                    Text("All happiness converges towards you, all good luck is on the way.")
                        .font(.system(size: 19.0))
                        .fontWeight(.semibold)
                        .minimumScaleFactor(0.5)
                        .foregroundColor(.white)

                    Spacer()

                    Text("Keep it up, workers!😄")
                        .font(.system(size: 16.0))
                        .minimumScaleFactor(0.5)
                        .foregroundColor(.white)
                    Spacer()
                }

                Spacer()

                // Right View
                VStack {
                    Spacer()
                    Text("06")
                        .font(.system(size: 50.0))
                        .fontWeight(.semibold)
                        .foregroundColor(.white)
                        .padding(EdgeInsets(top: -10.0, leading: 0.0, bottom: -10.0, trailing: 0.0))
                    Text("June 06, Monday")
                        .lineLimit(1)
                        .minimumScaleFactor(0.5)
                        .font(.system(size: 14.0))
                        .foregroundColor(.white)
                    Spacer()
                    Text("Share")
                        .fixedSize()
                        .font(.system(size: 14.0))
                        .padding(EdgeInsets(top: 5.0, leading: 20.0, bottom: 5.0, trailing: 20.0))
                        .background(.white)
                        .foregroundColor(.black)
                        .cornerRadius(12.0)
                    Spacer()
                }
                Spacer()
            }
            .padding(EdgeInsets(top: 0.0, leading: 10.0, bottom: 0.0, trailing: 10.0))
        }
    }
Then modify the entry point by opening DemoWidget.swift, where DemoWidgetEntryView is the View displayed by the component, so modify it to the QQSyncWidgetView we just created, as follows:
struct DemoWidgetEntryView : View {
    var entry: Provider.Entry

    var body: some View {
        QQSyncWidgetView()
    }
}
The effect is as follows:

The effect is already similar to QQ Sync Assistant, but the code above still needs optimization as the class is too bulky; we can encapsulate each VStack into a separate view for easier reuse. Create a SwiftUIView named QQSyncQuoteTextView for displaying the left half of the Widget; create the right half view named QQSyncDateShareView, and the final code will be:
QQSyncQuoteTextView class:
import SwiftUI

struct QQSyncQuoteTextView: View {
    var body: some View {
        VStack(alignment: .leading) {
            Spacer()
            Text("All happiness converges towards you, all good luck is on the way.")
                .font(.system(size: 19.0))
                .fontWeight(.semibold)
                .minimumScaleFactor(0.5)
                .foregroundColor(.white)

            Spacer()

            Text("Keep it up, workers!😄")
                .font(.system(size: 16.0))
                .minimumScaleFactor(0.5)
                .foregroundColor(.white)
            Spacer()
        }
    }
}
QQSyncDateShareView class:
import SwiftUI

struct QQSyncDateShareView: View {
    var body: some View {
        VStack {
            Spacer()
            Text("06")
                .font(.system(size: 50.0))
                .fontWeight(.semibold)
                .foregroundColor(.white)
                .padding(EdgeInsets(top: -10.0, leading: 0.0, bottom: -10.0, trailing: 0.0))
            Text("June 06, Monday")
                .lineLimit(1)
                .minimumScaleFactor(0.5)
                .font(.system(size: 14.0))
                .foregroundColor(.white)
            Spacer()
            Text("Share")
                .fixedSize()
                .font(.system(size: 14.0))
                .padding(EdgeInsets(top: 5.0, leading: 20.0, bottom: 5.0, trailing: 20.0))
                .background(.white)
                .foregroundColor(.black)
                .cornerRadius(12.0)
            Spacer()
        }
    }
}
Finally, modify QQSyncWidgetView to:
import SwiftUI

struct QQSyncWidgetView: View {
    var body: some View {
        ZStack {
            // Background image
            Image("widget_background_test")
                .resizable()

            // Left and right Views
            HStack {
                // Left View
                QQSyncQuoteTextView()

                // Right View
                QQSyncDateShareView()
            }
            .padding(EdgeInsets(top: 0.0, leading: 10.0, bottom: 0.0, trailing: 10.0))
        }
    }
}
Then run it again, and you will find that the effect is the same as before, bingo.
Different Widget Size Settings#
Next, let's look at [Widget Size Settings]. Currently, the Widget we developed displays perfectly at the Medium size, but the Small and Large sizes are not displayed correctly. How can we set this? How do we display different content for different sizes?
To set different content for different sizes of the Widget, we need to use WidgetFamily, which requires importing WidgetKit. For example, when setting Small, the right half of Medium should remain unchanged. How do we do this?
- Import
WidgetKitin the class to be set. - Declare the property
@Environment(\.widgetFamily) var family: WidgetFamily. - Use a
Switchstatement to enumeratefamily.
Note:
@Environmentis a predefined key inSwiftUI. For more information about@Environment, you can refer to the following two links:
The specific code is as follows:
import SwiftUI
import WidgetKit

struct QQSyncWidgetView: View {
    @Environment(\.widgetFamily) var family: WidgetFamily

    var body: some View {
        ZStack {
            // Background image
            Image("widget_background_test")
                .resizable()
            switch family {
            case .systemSmall:
                QQSyncDateShareView()
            case .systemMedium:
                // Left and right Views
                HStack {
                    // Left View
                    QQSyncQuoteTextView()

                    // Right View
                    QQSyncDateShareView()
                }
                .padding(EdgeInsets(top: 0.0, leading: 10.0, bottom: 0.0, trailing: 10.0))
//            case .systemLarge:
//                break
//            case .systemExtraLarge:
//                break
            default:
                QQSyncQuoteTextView()
            }
        }
    }
}
Run to see the effect as follows:

The effect is as expected, but the code looks a bit ugly. Let's optimize it again by encapsulating QQSyncWidgetMedium and QQSyncWidgetSmall into two classes, as follows:
import SwiftUI

struct QQSyncWidgetSmall: View {
    var body: some View {
        ZStack {
            // Background image
            Image("widget_background_test")
                .resizable()

            QQSyncDateShareView()
        }
    }
}
import SwiftUI

struct QQSyncWidgetMedium: View {
    var body: some View {
        ZStack {
            // Background image
            Image("widget_background_test")
                .resizable()

            // Left and right Views
            HStack {
                // Left View
                QQSyncQuoteTextView()

                Spacer()

                // Right View
                QQSyncDateShareView()
            }
            .padding(EdgeInsets(top: 0.0, leading: 20.0, bottom: 0.0, trailing: 20.0))
        }
    }
}
Then modify QQSyncWidgetView as follows:
import SwiftUI
import WidgetKit

struct QQSyncWidgetView: View {
    @Environment(\.widgetFamily) var family: WidgetFamily

    var body: some View {
        switch family {
        case .systemSmall:
            QQSyncWidgetSmall()
        case .systemMedium:
            QQSyncWidgetMedium()
//            case .systemLarge:
//                break
//            case .systemExtraLarge:
//                break
        default:
            QQSyncWidgetMedium()
        }
    }
}
Run again to check the effect, and it still meets expectations, but the code looks clearer. If you want to add a Large View, you just need to define the QQSyncWidgetLarge class and use it in the above place, which is convenient and quick.
Next, let's look at how I created the project. When adding a Widget, there are Small, Medium, and Large sizes available. Even if the Small and Large sizes are commented out in the Switch family, they still appear in the preview. However, when adding the QQ Sync Assistant's Widget, it only shows one Medium size. How is this achieved?
This is done by setting the supportedFamilies property at the @main entry point. The supportedFamilies takes an array of sizes, and if you pass in several sizes, it supports those sizes. To achieve the effect of QQ Sync Assistant, only pass in the .systemMedium size, as shown below:
@main
struct DemoWidget: Widget {
    let kind: String = "DemoWidget"

    var body: some WidgetConfiguration {
        StaticConfiguration(kind: kind, provider: Provider()) { entry in
            DemoWidgetEntryView(entry: entry)
        }
        .configurationDisplayName("My Widget")
        .description("This is an example widget.")
        .supportedFamilies([WidgetFamily.systemMedium]) // Set the array of supported sizes for the preview widget
    }
}
Widget Date Update#
The above display part has been completed. Next, let's look at [Date Settings]. Currently, the date is fixed. How can we make the date use the phone's time?
Considerations include:
- Where does the date come from? — You can directly use Date() in the Extension to get the current date.
- How to notify the refresh when the date is updated? Refer to cs193p-Developing Apps for iOS, use
ObservableObjectto define a property decorated with@Published, and then use a property decorated with@ObservedObjectin the View. This way, when the property decorated with@Publishedchanges, the property decorated with@ObservedObjectwill change, thus refreshing the interface.
The code implementation is as follows:
First, create a Swift file. Note that the model class is created using Swift, while the UI creation class is SwiftUI.
Create a new String_Extensions.swift to define a method for getting a string of a specified date type, as follows:
import Foundation

enum DisplayDateType {
    case Year
    case Month
    case Day
    case hour
    case minute
    case second
}

extension String {
    func getFormatDateStr(_ type: DisplayDateType) -> String {
        let dateFormatter = DateFormatter()
        dateFormatter.locale = Locale.current
        dateFormatter.dateFormat = "yyyy-MM-dd HH:mm:ss"
        guard let formatDate = dateFormatter.date(from: self) else { return "" }
        let calendar = Calendar.current
        _ = calendar.component(.era, from: formatDate)
        let year = calendar.component(.year, from: formatDate)
        let month = calendar.component(.month, from: formatDate)
        let day = calendar.component(.day, from: formatDate)
        let hour = calendar.component(.hour, from: formatDate)
        let minute = calendar.component(.minute, from: formatDate)
        let second = calendar.component(.second, from: formatDate)
        switch type {
        case .Year:
            return String(format: "%.2zd", year)
        case .Month:
            return String(format: "%.2zd", month)
        case .Day:
            return String(format: "%.2zd", day)
        case .hour:
            return String(format: "%.2zd", hour)
        case .minute:
            return String(format: "%.2zd", minute)
        case .second:
            return String(format: "%.2zd", second)
        }
    }


    func getWeekday() -> String {
        let dateFormatter = DateFormatter()
        dateFormatter.locale = Locale.current
        dateFormatter.dateFormat = "yyyy-MM-dd HH:mm:ss"
        guard let formatDate = dateFormatter.date(from: self) else { return "" }
        let calendar = Calendar.current
        let weekDay = calendar.component(.weekday, from: formatDate)
        switch weekDay {
        case 1:
            return "Sunday"
        case 2:
            return "Monday"
        case 3:
            return "Tuesday"
        case 4:
            return "Wednesday"
        case 5:
            return "Thursday"
        case 6:
            return "Friday"
        case 7:
            return "Saturday"
        default:
            return ""
        }
    }
}
Create a new QQSyncWidgetDateItem.swift class to get the year, month, day, week, hour, minute, and second as strings.
import Foundation

struct QQSyncWidgetDateItem {
    var year: String
    var month: String
    var day: String

    var week: String

    var hour: String
    var minute: String
    var second: String

    static func generateItem() -> QQSyncWidgetDateItem {
        let dateStr = date2String(date: Date())

        let year = dateStr.getFormatDateStr(DisplayDateType.Year)
        let month = dateStr.getFormatDateStr(DisplayDateType.Month)
        let day = dateStr.getFormatDateStr(DisplayDateType.Day)

        let week = dateStr.getWeekday()

        let hour = dateStr.getFormatDateStr(DisplayDateType.hour)
        let minute = dateStr.getFormatDateStr(DisplayDateType.minute)
        let second = dateStr.getFormatDateStr(DisplayDateType.second)

        let item = QQSyncWidgetDateItem(year: year,
                                     month: month,
                                     day: day,
                                     week: week,
                                     hour: hour,
                                     minute: minute,
                                     second: second)
        return item
    }

    static func date2String(date:Date, dateFormat:String = "yyyy-MM-dd HH:mm:ss") -> String {
        let formatter = DateFormatter()
        formatter.locale = Locale.init(identifier: "zh_CN")
        formatter.dateFormat = dateFormat
        let date = formatter.string(from: date)
        return date
    }
}
Create QQSyncWidgetDateShareItem.swift, similar to a utility, to convert the model into a view that can be displayed directly and handle the logic for responding to clicks.
import Foundation
import SwiftUI


class QQSyncWidgetDateShareItem: ObservableObject {

    @Published private var dateItem = QQSyncWidgetDateItem.generateItem()


    func dateShareStr() -> String {
        let resultStr = dateItem.month + " month " + dateItem.week
        return resultStr
    }

    func dayStr() -> String {
        return dateItem.day
    }

    // MARK: action

}
Then modify the QQSyncDateShareView class to add a QQSyncWidgetDateShareItem property, and change the fixed date to be retrieved from QQSyncWidgetDateShareItem.
import SwiftUI

struct QQSyncDateShareView: View {
    @ObservedObject var dateShareItem: QQSyncWidgetDateShareItem

    var body: some View {
        VStack {
            Spacer()
            Text(dateShareItem.dayStr())
                .font(.system(size: 50.0))
                .fontWeight(.semibold)
                .foregroundColor(.white)
                .padding(EdgeInsets(top: -10.0, leading: 0.0, bottom: -10.0, trailing: 0.0))
            Text(dateShareItem.dateShareStr())
                .lineLimit(1)
                .minimumScaleFactor(0.5)
                .font(.system(size: 14.0))
                .foregroundColor(.white)
            Spacer()
            Text("Share")
                .fixedSize()
                .font(.system(size: 14.0))
                .padding(EdgeInsets(top: 5.0, leading: 20.0, bottom: 5.0, trailing: 20.0))
                .background(.white)
                .foregroundColor(.black)
                .cornerRadius(12.0)
            Spacer()
        }
    }
}
Then modify the places where QQSyncDateShareView is called, adding property declaration code in both QQSyncWidgetSmall and QQSyncWidgetMedium, and modify the parameters passed in; then modify the places that reference these two classes, namely QQSyncWidgetView, to also add property declarations and modify the parameters passed in; finally, modify the DemoWidget class where DemoWidgetEntryView is used, changing it to:
struct DemoWidgetEntryView : View {
    var entry: Provider.Entry

    var body: some View {
        QQSyncWidgetView(dateShareItem: QQSyncWidgetDateShareItem())
    }
}
Finally, modify the refresh timing, that is, when to refresh the widget data, which is controlled by the getTimeline(in context: Context, completion: @escaping (Timeline<Entry>) -> ()) method in TimeLineProvider, modifying it to refresh every 2 hours.
    func getTimeline(in context: Context, completion: @escaping (Timeline<Entry>) -> ()) {
        let entry = SimpleEntry(date: Date())
        // refresh the data every two hours
        let expireDate = Calendar.current.date(byAdding: .hour, value: 2, to: Date()) ?? Date()
        let timeline = Timeline(entries: [entry], policy: .after(expireDate))
        completion(timeline)
    }
Then run and debug, and when you change the date, you will find that the date data displayed in the widget changes with the phone's date, done.
Widget Network Data Logic#
Comparing the QQ Sync Assistant's Widget, you can see that the background image and text change automatically after a period of time. Next, let's look at how to achieve this effect. The background image changes and the text changes are similar, both are network requests that update the data. Here, we will only take the text update as an example.
First, find an API for random quotes, you can refer to https://github.com/vv314/quotes. Here, we choose the Hitokoto API, which is: https://v1.hitokoto.cn/. After finding the API, let's see how to implement network requests for the widget.
Create a Network folder, and in the Network folder, create NetworkClient.swift to encapsulate the URLSession network request, as follows:
import Foundation

public final class NetworkClient {
    private let session: URLSession = .shared

    enum NetworkError: Error {
        case noData
    }

    func executeRequest(request: URLRequest, completion: @escaping (Result<Data, Error>) -> Void) {
        session.dataTask(with: request) { data, response, error in
            if let error = error {
                completion(.failure(error))
                return
            }

            guard let data = data else {
                completion(.failure(NetworkError.noData))
                return
            }

            completion(.success(data))
        }.resume()
    }
}
In the Network folder, create URLRequest+Quote.swift to generate the URLRequest for the quote, as follows:
import Foundation

extension URLRequest {
    private static var baseURLStr: String { return "https://v1.hitokoto.cn/" }

    static func quoteFromNet() -> URLRequest {
        .init(url: URL(string: baseURLStr)!)
    }
}
Then, according to the returned data format, create a model class for the returned data. Create QuoteResItem.swift, where only the hitokoto field is needed, so we only need to define this field, as follows:
import Foundation

struct QuoteResItem: Codable {
    /**
     "id": 6325,
     "uuid": "2017e206-f81b-48c1-93e3-53a63a9de199",
     "hitokoto": "Self-blame should be brief, but remember it for a long time.",
     "type": "h",
     "from": "When you are asleep",
     "from_who": null,
     "creator": "Shen Shiyun",
     "creator_uid": 6568,
     "reviewer": 1,
     "commit_from": "web",
     "created_at": "1593237879",
     "length": 14
     */
    var hitokoto: String

    // Default object generation
    static func generateItem() -> QuoteResItem {
        let item = QuoteResItem(hitokoto: "All happiness converges towards you, all good luck is on the way.")
        return item
    }
}
Then, in the Network folder, create QuoteService.swift to define the external calling interface and encapsulate the request logic internally, as follows:
import Foundation

public struct QuoteService {
    static func getQuote(client: NetworkClient, completion: ((QuoteResItem) -> Void)?) {
        quoteRequest(.quoteFromNet(),
                     on: client,
                     completion: completion)
    }

    private static func quoteRequest(_ request: URLRequest,
                                     on client: NetworkClient,
                                     completion: ((QuoteResItem) -> Void)?) {
        client.executeRequest(request: request) { result in
            switch result {
            case .success(let data):
                let decoder = JSONDecoder()
                do {
                    let quoteItem = try decoder.decode(QuoteResItem.self, from: data)
                    completion?(quoteItem)
                } catch {
                    print(error.localizedDescription)
                }
            case .failure(let error):
                print(error.localizedDescription)
            }
        }
    }
}
Then add the entry for the call. Before adding the call, consider the usage scenario. Similar to the date, define a property decorated with Published, and then use a property decorated with @ObservedObject to listen for changes.
Create QQSyncWidgetQuoteShareItem.swift to handle the Quote data, as follows:
import Foundation

class QQSyncWidgetQuoteShareItem: ObservableObject {
    @Published private var quoteItem = QuoteResItem.generateItem()

    func quoteStr() -> String {
        return quoteItem.hitokoto
    }

    func updateQuoteItem(_ item: QuoteResItem) {
        self.quoteItem = item
    }
}
In QQSyncQuoteTextView.swift, add a property and modify the usage as follows:
import SwiftUI

struct QQSyncQuoteTextView: View {
    @ObservedObject var quoteShareItem: QQSyncWidgetQuoteShareItem

    var body: some View {
        VStack(alignment: .leading) {
            Spacer()
            Text(quoteShareItem.quoteStr())
                .font(.system(size: 19.0))
                .fontWeight(.semibold)
                .minimumScaleFactor(0.5)
                .foregroundColor(.white)

            Spacer()

            Text("Keep it up, workers!😄")
                .font(.system(size: 16.0))
                .minimumScaleFactor(0.5)
                .foregroundColor(.white)
            Spacer()
        }
    }
}
Then modify the QQSyncWidgetMedium.swift and QQSyncWidgetView.swift to add the error handling, similar to above, adding @ObservedObject var quoteShareItem: QQSyncWidgetQuoteShareItem and modifying the parameters passed in.
Finally, modify DemoWidget.swift
- Modify
SimpleEntryto add the definedQQSyncWidgetQuoteShareItemproperty. - Modify
DemoWidgetEntryViewto pass in the parameterentry.quoteShareItem. - Modify
Providerplaceholder(in context: Context) -> SimpleEntryto add the parameter, using default values.getSnapshot(in context: Context, completion: @escaping (SimpleEntry) -> ())to add the parameter, using default values.getTimeline(in context: Context, completion: @escaping (Timeline<Entry>) -> ())method — add the network request call, generate the correspondingQQSyncWidgetQuoteShareItemfrom the network return object, and use the generated item as the parameter.
The code is as follows:
struct Provider: TimelineProvider {
    func placeholder(in context: Context) -> SimpleEntry {
        SimpleEntry(date: Date(), quoteShareItem: QQSyncWidgetQuoteShareItem())
    }

    func getSnapshot(in context: Context, completion: @escaping (SimpleEntry) -> ()) {
        let entry = SimpleEntry(date: Date(), quoteShareItem: QQSyncWidgetQuoteShareItem())
        completion(entry)
    }

    func getTimeline(in context: Context, completion: @escaping (Timeline<Entry>) -> ()) {
        QuoteService.getQuote(client: NetworkClient()) { quoteResItem in
            let quoteShareItem = QQSyncWidgetQuoteShareItem()
            quoteShareItem.updateQuoteItem(quoteResItem)
            let entry = SimpleEntry(date: Date(), quoteShareItem: quoteShareItem)
            // refresh the data every two hours
            let expireDate = Calendar.current.date(byAdding: .hour, value: 2, to: Date()) ?? Date()
            let timeline = Timeline(entries: [entry], policy: .after(expireDate))
            completion(timeline)
        }
    }
}

struct SimpleEntry: TimelineEntry {
    let date: Date

    var quoteShareItem: QQSyncWidgetQuoteShareItem
}

struct DemoWidgetEntryView : View {
    var entry: Provider.Entry

    var body: some View {
        QQSyncWidgetView(dateShareItem: QQSyncWidgetDateShareItem(), quoteShareItem: entry.quoteShareItem)
    }
}
Debug to see the effect. You can see that the displayed text has changed, indicating that it has used the data returned from the network. You can also test the widget's refresh timing. In the code above, it is set to refresh every two hours, so you can adjust the phone's time forward by two hours and then check the widget effect again. You will find that the text has changed, indicating that the data has refreshed, great, completed.
The final complete effect is as follows:

The complete code has been placed on Github in Tutorial2-QQ Sync Assistant widget, link: https://github.com/mokong/WidgetAllInOne
In the next article, I will first talk about the use of WidgetBundle, and then discuss how to implement an Alipay Widget effect.